


Kickoff meeting
Interested in finding out more about how we can help you?
SOFTWARE DEVELOPMENT - THE LONG READ
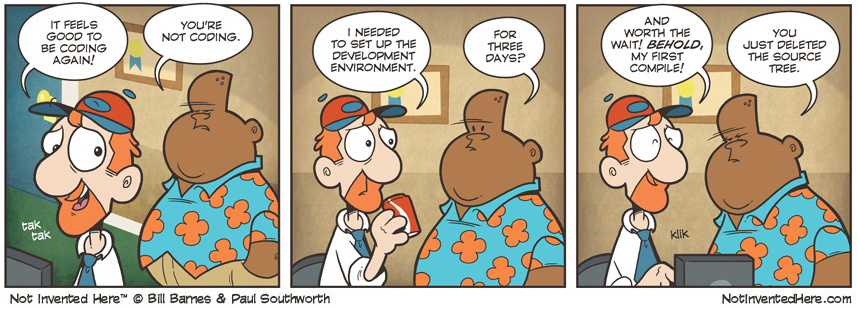
It works on everyone`s machine. How we code MVPs and continuously develop them.
Finally, the fun part. Once we have the user stories and wireframes, the estimated time and cost, the technology stack and a thorough plan to go by, we can put them to good use. This is the story of how MVPs get coded and the best practices which allow this code to work on everyone else's machine as well.

For an easier read, we've broken it down into four stages:
1. Setup
1.1 Development environment
2. Development
2.1 Gitflow standards
2.2.Committing and reviewing code
2.3. Coding standards
2.4. Technical documentation
3. Testing
3.1. The three levels of testing
3.2. Software testing in CI/CD
4. Deployment - hurray!
4.1 Automatic deployment and pipelines
And, of course, a touch of agile project management is needed to keep 1 through
4 together. Although not involved directly in development, the project manager is responsible for
driving the work through the entire process and to completion.
For MVPs, this means going through all the steps for a successful launch, with testable milestones
and a clear timeline to improve time to market. Once the MVP starts growing, we do continuous
development, with small iterations and frequent deployments to gather as much feedback as possible.
If you thought software development ends after you launch, you are wrong. Software development never
ends. Never! :)
1/4 SETUP
Here's to some more work before work
As you might have noticed from the previous articles, there are a lot of things
which need to be put in place before actual development can start. In fact, there are so many that
it feels like most of the work is done before the actual work starts. But trust us, the bulk of it
is still in the code. That's why we need everything set up just right.
At the start of a project/MVP, developers will often spend a certain amount of time doing setup.
This can mean anything from “Oh, I`m just setting up build automation” to “Do not disturb. I'm
figuring out dependency management and I haven't had my coffee yet”. While there are thousands of
tools for setting up “the basics”, the most time-consuming bits are always the project-specific
ones. This is because developers need to set up the right environment, tool, libraries and basic
code structure for the currently required functionalities, based on a certain technology stack and
according to the agreed upon technical solution. We always include setup in our technical estimates
(more on estimates here),
precisely because the amount of time spent on it varies from project to project.
Specific requirements aside, when setting up the ecosystem for a web development project we usually do some variation of the following:
- We create the project repository
- We initialize git-flow inside the created repository (more on Gitflow standards and repository structure below)
- We install required packages and dependencies (e.g. Laravel Passport for authentication)
- We set up the database
- We set up Redis for caching and queue execution
- We set up staging server for automatic deploy
- If the project requires file upload, we set up buckets and an upload system
2/4 DEVELOPMENT
Being in the Gitflow
Developers write code. Code gets stored safely and shared with the help of some
version control tool, usually Git. Think of Git as really advanced Google Docs, a tool through which
you can collaborate, have a history of track changes, review changes or revert back to a previous
version.
However, unlike Google Docs, Git allows multiple versions of the “truth” to co-exist. Essentially,
each developer has a copy of the repository, unlike Google Docs where everyone works on a
centralized copy. For example, in Git you may have several versions of the software simultaneously
in production or you may deliver bug fixes on a previous version.
Because each developer has his version of the “truth”, there needs to be a way to prevent conflict.
Some kind of rules put in place to make working with so many versions less confusing. These rules
are called Gitflow. Gitflow is just one of several ways of managing the branching and merging
workflow, but it's probably the most popular.
Simply put, Gitflow is a set of rules every team member follows when they
submit a piece of code. Gitflow specifies what should be submitted to a particular branch and how a
branch should branch off even further or merge into another branch. This is really useful for
standardizing version control practices between teams and for faster project onboarding. Basically,
you know where everything is without having to go into project specifics.
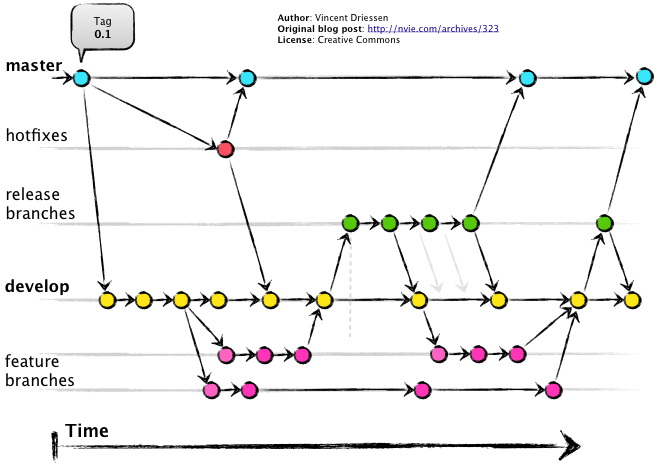
The basic Gitflow model consists of two main branches (master and develop) and three working
branches (feature, release, hotfixes). Some versions of Gitflow also include support branches, which
are used, for example, to offer bug fixing for older versions of the app. Unlike the main branches,
working branches always have a limited life time.
- Master- this is live, production code. When creating a new feature, developers don't work on this branch directly. They create new Feature branches and when they're done, changes get merged back into Master through Develop.
- Develop - otherwise known as staging, this acts as a buffer between what's considered a finished job in terms of development and what's actually in production. According to the Gitflow model, everything is merged into this branch first and then in Master. This is why some call it the “integration branch”. This is where any automatic nightly builds are built from.
- Feature - used to develop new features for the upcoming or a distant future release. Feature branches exist as long as the feature is in development, but will eventually be merged back into Develop or discarded.
- Release - supports preparation of a new production release. This allows for minor bug fixes and preparing meta-data for a release (version number, build dates, release notes etc.). By doing all of this work on a Release branch, the Develop branch is cleared to receive features for the next big release.
- Hotfixes - used to quickly fix problems in production. When a critical bug in a production version must be resolved immediately, a hotfix branch may be branched off from that production version.
We use specific feature branches for each task (more on tasks and project planning here). All tasks are resolved in their own feature branch and when this is done, they are merged into Develop. In this way, we have a stable Develop branch which supports regular and continuous releases.
The subtle art of committing and reviewing code
For code to actually be stored in a version control system, it first needs to
be submitted and then approved. You can contribute code through pull requests. Basically, “pull
requests” mean you request the maintainer of the repository to pull in your code. Pull requests
contain one or more commits.
A pull request is always associated with a branch. In other words, a pull request is a request to
merge one branch into another and is issued after one or several commits. Good commits follow the
Single Responsibility Principle, meaning one commit changes one thing in the code and one thing
only. You can easily test this principle in your commit message. If you reach the word “and”, you
stop :)
We like to keep commit messages code-level and on point and use pull request descriptions for a
higher-level, architectural understanding of the change. A high-level summary of the issue is very
useful for people looking back through a repository`s history, in addition to going through the
individual code changes. This is why we avoid squashing commits on merge, so we are easily able to
keep track of historical changes.
After creating a pull request, a team member then comes in to review the proposed changes. There are
countless articles on how to submit good pull requests, meaning pull requests which make your life
and the reviewer`s life easier, but what we`ve found particularly useful are pull request templates.
We`ve written a whole article on the topic and even included some of the pull requests templates we
use for frontend and backend. To keep it short, we use them as checklists; the person who submits a
pull request can go through the checklist and make sure nothing important was omitted.

The reviewer can then read the pull review description, go through the checklist as well and get a glimpse of the progress that has been made. Reviewing a pull request is as much of an art as submitting one. Giving feedback on someone else's work can be tricky, but we always try to follow these three simple rules when reviewing pull requests:
- Read everything carefully. This includes title, descriptions, checklists, screenshots and videos, if any. Even references to related issues/tickets.
- Don't just point out the problem. Try to suggest an alternative, simpler way of doing things, where possible.
- Be polite and helpful.
Coding with style (and standards)
Imagine waking up one day and not being able to understand your own
handwriting. Now imagine you've written down something really important the previous day. That's
what looking back on your own code would feel like without coding standards. Multiply this by dozens
and you get a whole team of developers working together on the same unintelligible codebase.
Coding standards are boring. In fact they're so boring, most of them are automatically enforced by
static code analyzers, also known as linters. But they exist for a couple of reasons. One of them is
sanity, yours and everyone else`s. The other one is cutting down on maintenance cost and technical
debt. Maintaining a piece of code constitutes 60% of its lifetime cost on average1, meaning the code
will be read by a developer numerous times after it was first written. Therefore, the easier the
code is to read, the cheaper it ends up being.
We enforce coding standards through linters and code peer reviews. As mentioned above, linters are
tools which check code against a set of rules and flag violations of those rules as errors. A linter
can also be configured to check compliance with a given style-guide, depending on the language the
code has been written in (e.g. PSR-2 for PHP). Linters have gotten a lot better over time at
spotting inconsistencies or even unnecessary complexity in code, but they still have their
limitations. We use code peer reviews to weed out issues which would otherwise go unnoticed by
linters, such as faulty logical structures.
What happens when you don’t invest in coding standards? A software developer`s
version of hell ensues. You have PHP along with HTML, CSS, and Javascript in one file. Comments vary
in vagueness from “oopsie” to “minor change” or “work on feature x”, followed by 20 commits in a row
with no way to discern between them. Variables, classes, methods names are inconsistent and full of
typos and entire chunks of code are indented in a weird manner.
Although not syntactically significant to code interpreters, coding standards are significant to
humans. They make reading code easier by enforcing rules regarding:
- Formatting: this is what makes your eyes not bleed. Things such as indentation of block statements, brace placement, whitespace
- Naming conventions: are you sure you want to name your variable a_rather_ long_and_ vague_ variable?
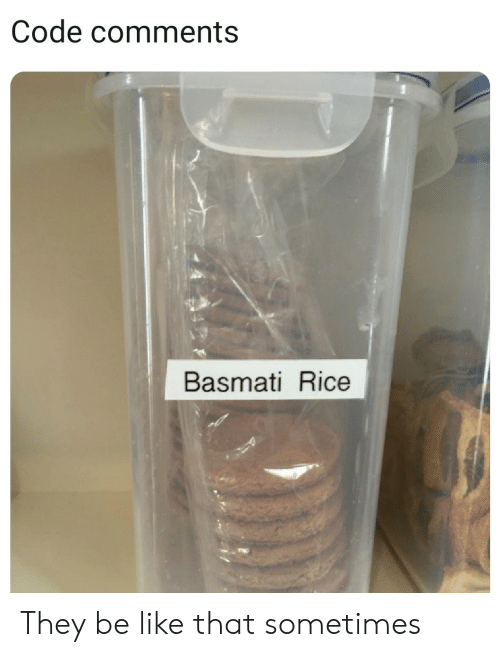
- Comments : granted, coming up with effective commenting rules can be tricky. Ones that will be relevant in a peer review, but won't turn into a mindless checklist activity that produces notes like: "You forgot to comment on line 31". A good rule of thumb is that comments speak where code fails to speak for itself. Good comments also explain why the code does what it does, not how.
The lazy developer jumps over the technical docs. And regrets it later.
Remember how we mentioned it's a good idea to properly comment your code? Guess what? You can also
generate code documentation based on comments. While we don`t recommend making this the only source
of documentation, it does give you an easy way to get started. Technical documentation is much like
pizza in this sense. Even when it's bad or too little, it's still better than nothing.
Many languages have the ability to turn comments into nicely rendered docs that can link to other
pieces of documentation. Kind of like a Wikipedia page for your code. We use documentation comments
(known as Doc Blocks) particularly for API documentation. The further removed from the source code
your API documentation is, the more likely it is to become outdated or inaccurate over time. So the
best strategy is to embed the documentation directly into the code and then use a tool to extract
it.
If user stories focus on the end user's experience with the app, technical docs focus on the specs
which make this possible. Most of the time, multiple functionalities are required in order to
deliver the action described by the user story. And in almost all cases, multiple development
decisions go into one functionality. Take for example the simple action of logging in. What type of
login should we implement, email and password or social login? Should the input fields have
restrictions? How should they detect and handle errors, like invalid emails addresses? How long
should the information be stored for the “Remember Me” option? Bottom line, technical docs cannot be
separated from the development context. That's why we write technical docs as we code and we keep
them updated throughout the development process.
For community projects, such as APIs, libraries or some of the open-source work we've done, the
first interaction someone has with the project is usually through the README file. In such cases,
having a well structured, well written README file is the first step in pitching your product to a
wider audience. In fact, some take this “first step” literally and advocate for a README driven
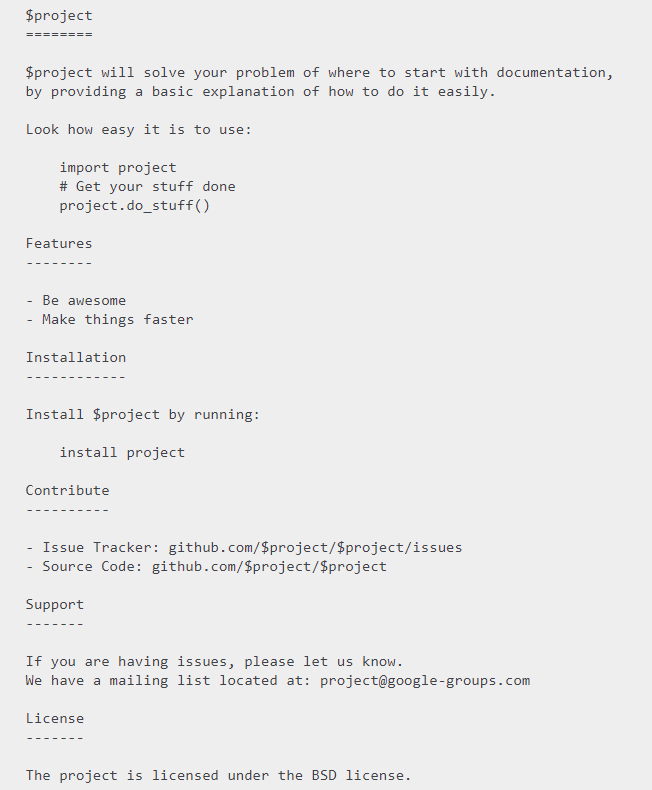
development. Below is a simple template for writing easy to read and useful README docs.
3/4 TESTING
The three pillars of software testing
As the saying goes, the purpose of testing is not to break things, it`s to
dispel the illusion that things work. This can range from making sure your app doesn't crash as soon
as someone writes their name in an input field to the most obscure edge cases.
The world of software quality assurance is huge. However, there are three fundamental levels at
which an app is tested by developers before they show their work to someone else, i.e. before the
app gets tested by end users or the client, otherwise known as user acceptance testing (UAT).
The following tests are written by developers to check increasingly more complex bits and pieces of
code. They are usually written in the same language as that of the app and they`re stored together
with the main software code in a version control system. We usually write tests as we code and they
get peer reviewed in the same manner as we review all our code.
1. Unit tests - they are the building blocks of software testing. Developers write unit tests
to make sure a certain unit of code (e.g. method, class, function) works as expected across a range
of valid and invalid inputs. Let's say you have a function 2VAL which, given two values, x and y,
always returns x+y. The unit test would execute the function with two input values and confirm the
output is x+y.
2. Feature tests - they cover the most important functionalities of a component or system.
How the features should work may be described in the app’s specs or product documentation and can
range from quite technical (Do endpoints return what they're supposed to return?) to
self-explanatory (Does social login work?)
3. Integration tests - higher level than feature tests. They verify that different components
of your app, like modules or services, work well together. For example, it can be testing the
interaction with the database or making sure that microservices play nice together.
After being tested by the development team, apps usually undergo some form of user experience
testing. This comes as close as possible to what happens when the app is used day-to-day by regular
users, from something as simple as submitting a form to more complex scenarios. The app is accessed
in a staging environment and is usually populated with dummy data. UAT is part of this type of
end-to-end testing and is usually a great opportunity for clients to provide feedback to the
development team and to validate features against business requirements.
Software testing in CI/CD
Testing software is time consuming. Testing software by hand is even worse. If only there was a way
to not only automate tests, but to integrate them in your development workflow. Enter CI/CD, short
for continuous integration/continuous delivery or deployment. That` right, CD can stand either for
delivery or for deployment (confusing, we know), depending on the degree of automation. But let's
not get ahead of ourselves. We`ll be talking about these differences in depth in the later
section.
For now, it's important to know that CI/CD is a set of practices designed to allow development teams
to deliver changes faster and with less conflict, both human-level and code-level. The primary idea
is to automate build, testing and deployment through scripts in order to: a.) minimize bugs, merge
conflicts, human error, anything standing between you and a successful release b.) continuously
build, test and deploy code and easily roll back if something goes wrong. This means releases are
less difficult to manage and less risky and therefore they can happen more frequently.
Let's say you have your code stored in a Git repository. Most version control systems nowadays have
CI/CD tools built into them, like GitLab CI/CD or GitHub Actions. These tools ensure that tests are
run automatically whenever a new piece of code is committed. To put it otherwise, you cannot commit
a piece of code unless every single test in the codebase is passing and there are tests in place to
cover all new code in the codebase. The point here is twofold. First, to make sure that the new code
you just wrote doesn't break the old code. Think of it like your past self keeping your future self
from doing something awful. Second, to determine automatically whether the new code has tests.
Just like passing an exam, in order to pass a test, the code must comply with certain requirements.
For automated tests, these requirements are written down in scripts as sequences of actions and what
you expect to happen once these actions are performed. In order to verify how much of your code is
actually covered by scripts, a universal metric is used: test coverage. This metric calculates how
much of your code runs when the tests are executed. The parts which didn`t run (and there always
will be such parts) are not covered by the existing tests.
If CI/CD is responsible for what can be done automatically, your branching and merging workflow
(remember Gitflow?) ultimately dictates how things should be set up. A basic CI/CD setup following a
Gitflow logic might look something like this:
- Run automated tests on all branches except Master.
- Automatically deploy after every merge into Master.
CI/CD and Gitflow are important parts of our development process. We use them to make sure tests are in place, releases are painless and everyone follows the same workflow across the entire thing. Since it takes the pressure off release day (no need to pause development for release, issues are easier to fix due to deploying in small batches), it allows us to deploy more often and get feedback from our clients a lot faster.
4/4 DEPLOYMENT
Down the rabbit hole. Automatic deployment and pipelines
You can use CI/CD to automate anything from building and testing up to
deployment and release. “Pipeline” is a visually suggesstive term usually associated with CI/CD.
It`s used to define both the degree to which a workflow is automated and the sequence of steps which
needs to run.
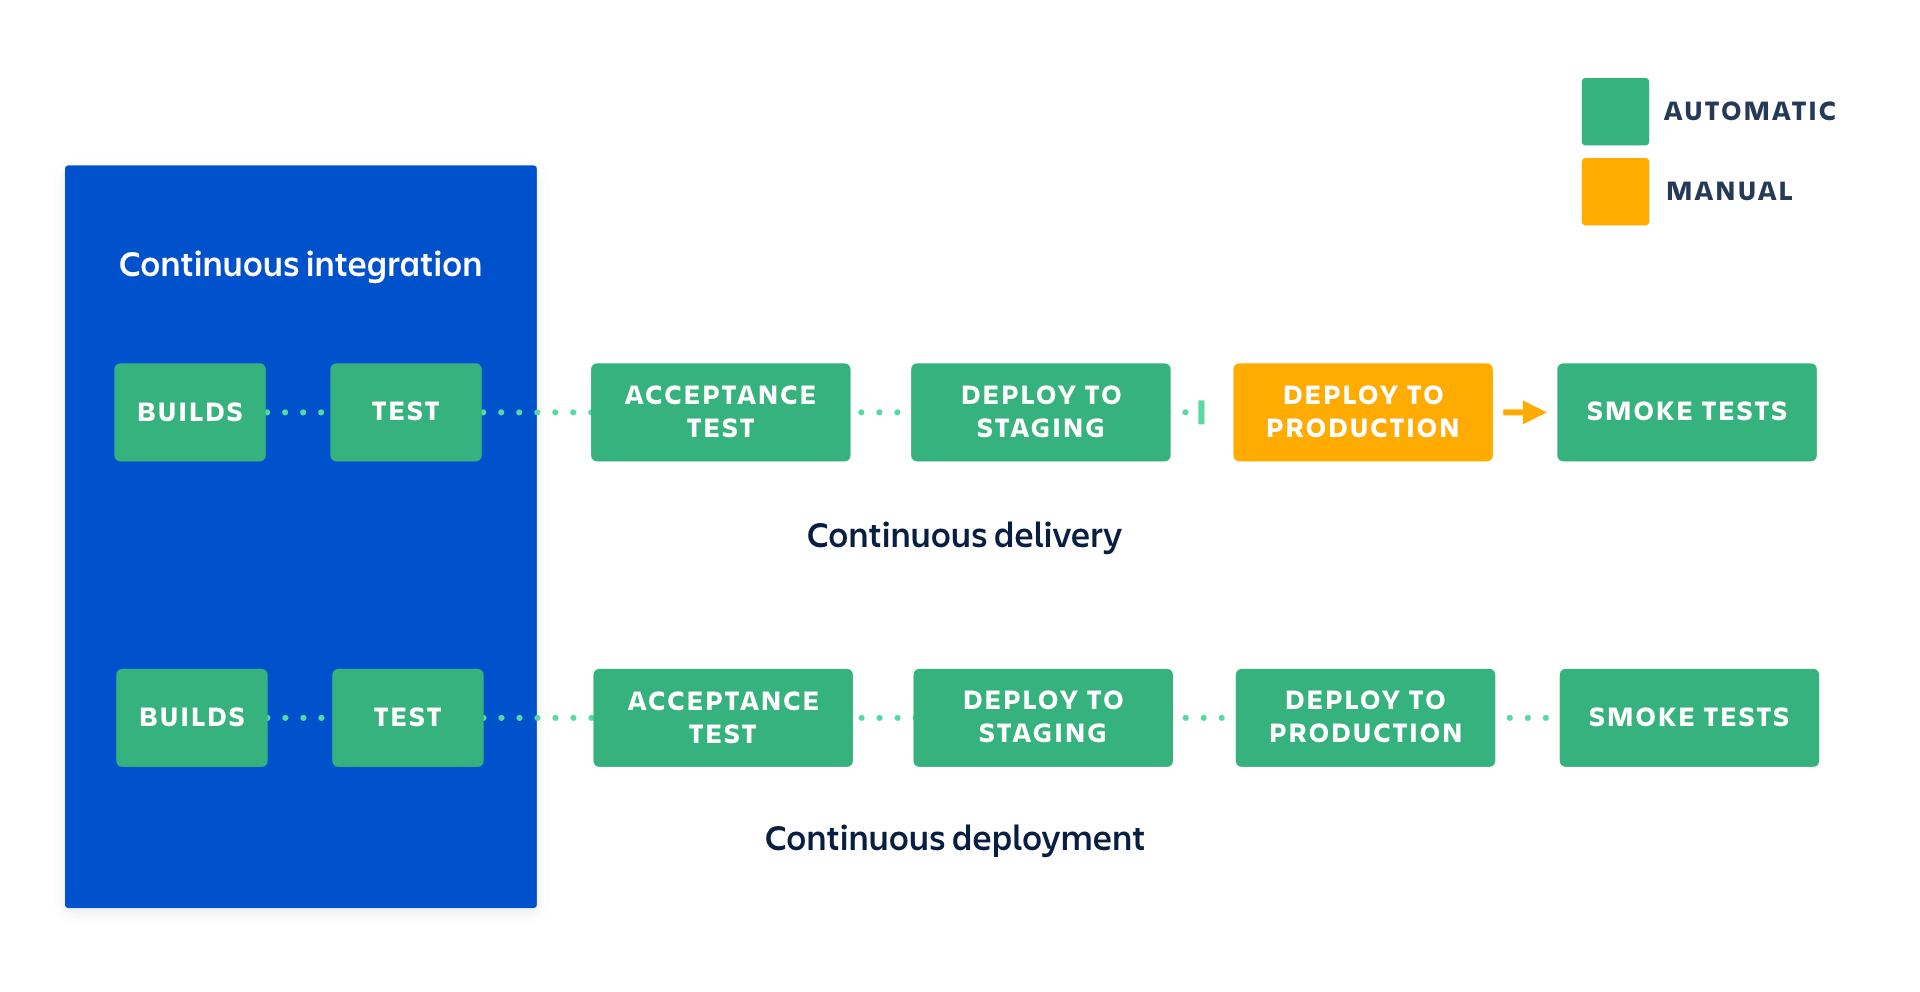
- A Continuous Integration pipeline will focus on automatically building and testing changes to your codebase, making sure your code complies with the requirements put in place. It places heavy emphasis on automated tests and on making sure broken code is not integrated into the main branch. This method ensures code is checked automatically, but requires you to manually trigger the deployment of these changes.
- A Continuous Deliv ery pipeline means that, on top of having automated tests for each new feature, improvement or bug fix, you also partially automate your release process. The trigger for deploying to production is still manual, but once deployment is started by selecting a build and pressing the release button, there shouldn't be a need for human intervention.
- A Continuous Deployment pipeline is a step beyond continuous delivery. The app is set to deploy automatically and it requires no human intervention throughout the pipeline, with the exception of actual code review. Once a change passes all the stages in the pipeline, it is released directly to customers. Only a failed test will prevent a new change to be deployed to production.
We run a CI/CD pipeline to automate the most important steps in the deployment process:
- Preparation of the target environment, either through installing or configuring the necessary software or by starting up a virtual host
- Deployment
- Deployment-related tasks, such as running database migration scripts
- Performing any required configuration
- Performing a deployment test (otherwise known as “smoke test”) to make sure that vital external services are reachable and that the system is working. For example, you may want to check the availability of network addresses/servers or that certificates and registry keys exist or that minimum disk space requirements are met.
We automate deployment for projects which require frequent releases and tight feedback loops. What's more, this helps us make sure everything works as expected in real-life. Deploying to a production environment only when development is complete means you have zero guarantees that a particular release will work for end users. Automated deployments allow you to easily test your code in a production-like environment as many times as you need and as often as you need.
Ready to get started?
If you’re a start-up looking for a technical partner to be there for the ride, look no further. We specialize in helping start-ups validate, launch and scale their MVP. Contact us now to get your project off the ground.
 Facebook
 LinkedIn
 Twitter