

July 22nd, 2026, posted in for_founders
by Adelina
Setting up source control. Maintaining legacy code. Dailies. What do all have in common? They can be tedious, but all of it needs doing. Just like settling on a pull request workflow and sticking with it.
If you`re like us, you probably love coding, but hate the grunt work. That`s one of the reasons we picked up pull request templates (PR templates for short) as a simple tool to improve our workflow. We get to keep things neat and tidy without the tediousness.
And they`re also a great way to make sure you`re not missing anything important when submitting a pull request. When you add a PR template to your repository, the PR description will be automatically populated with the template`s contents and all project contributors will have access to it.
In this article, we`re going to walk you through the steps of creating PR templates on two of the most popular platforms: GitHub and Bitbucket. We also included two PR templates we use in our daily work, which you can customize for your own projects. Finally, we`re going to talk about the benefits of using PR templates and what we`ve gained out of the whole thing.
Adding a PR template to your repository
GitHub
You can create PR templates as files in your repository, either as simple text files or markdown (.md or .markdown). To make sure collaborators can also use the template, store the file on the repository`s default branch.
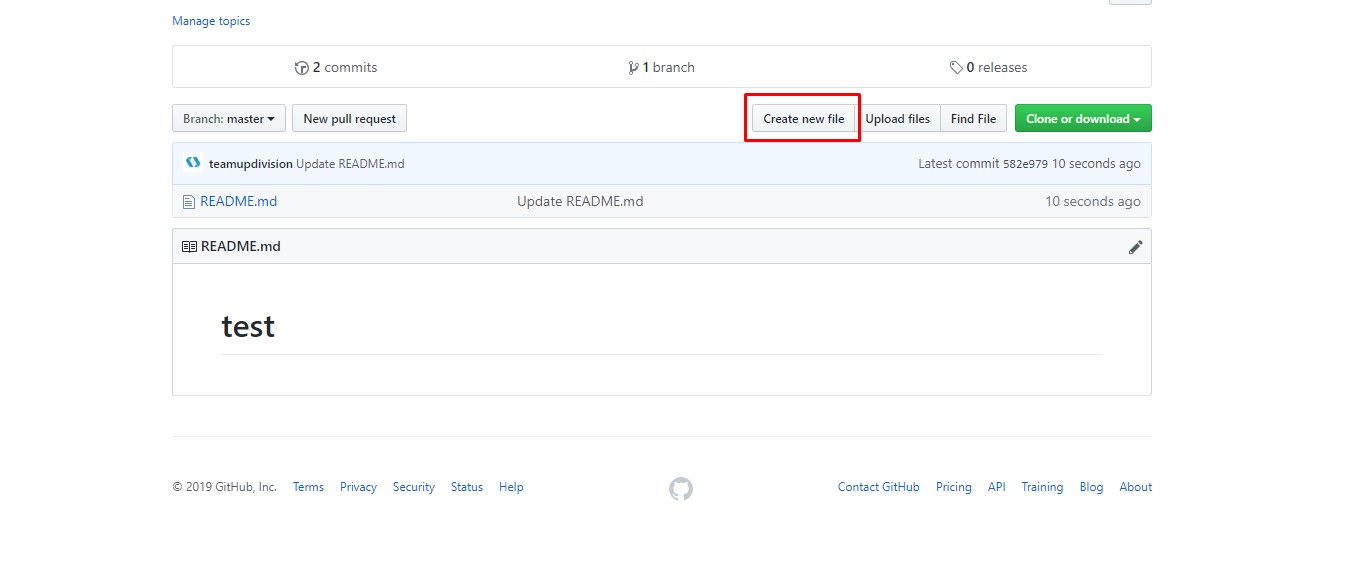
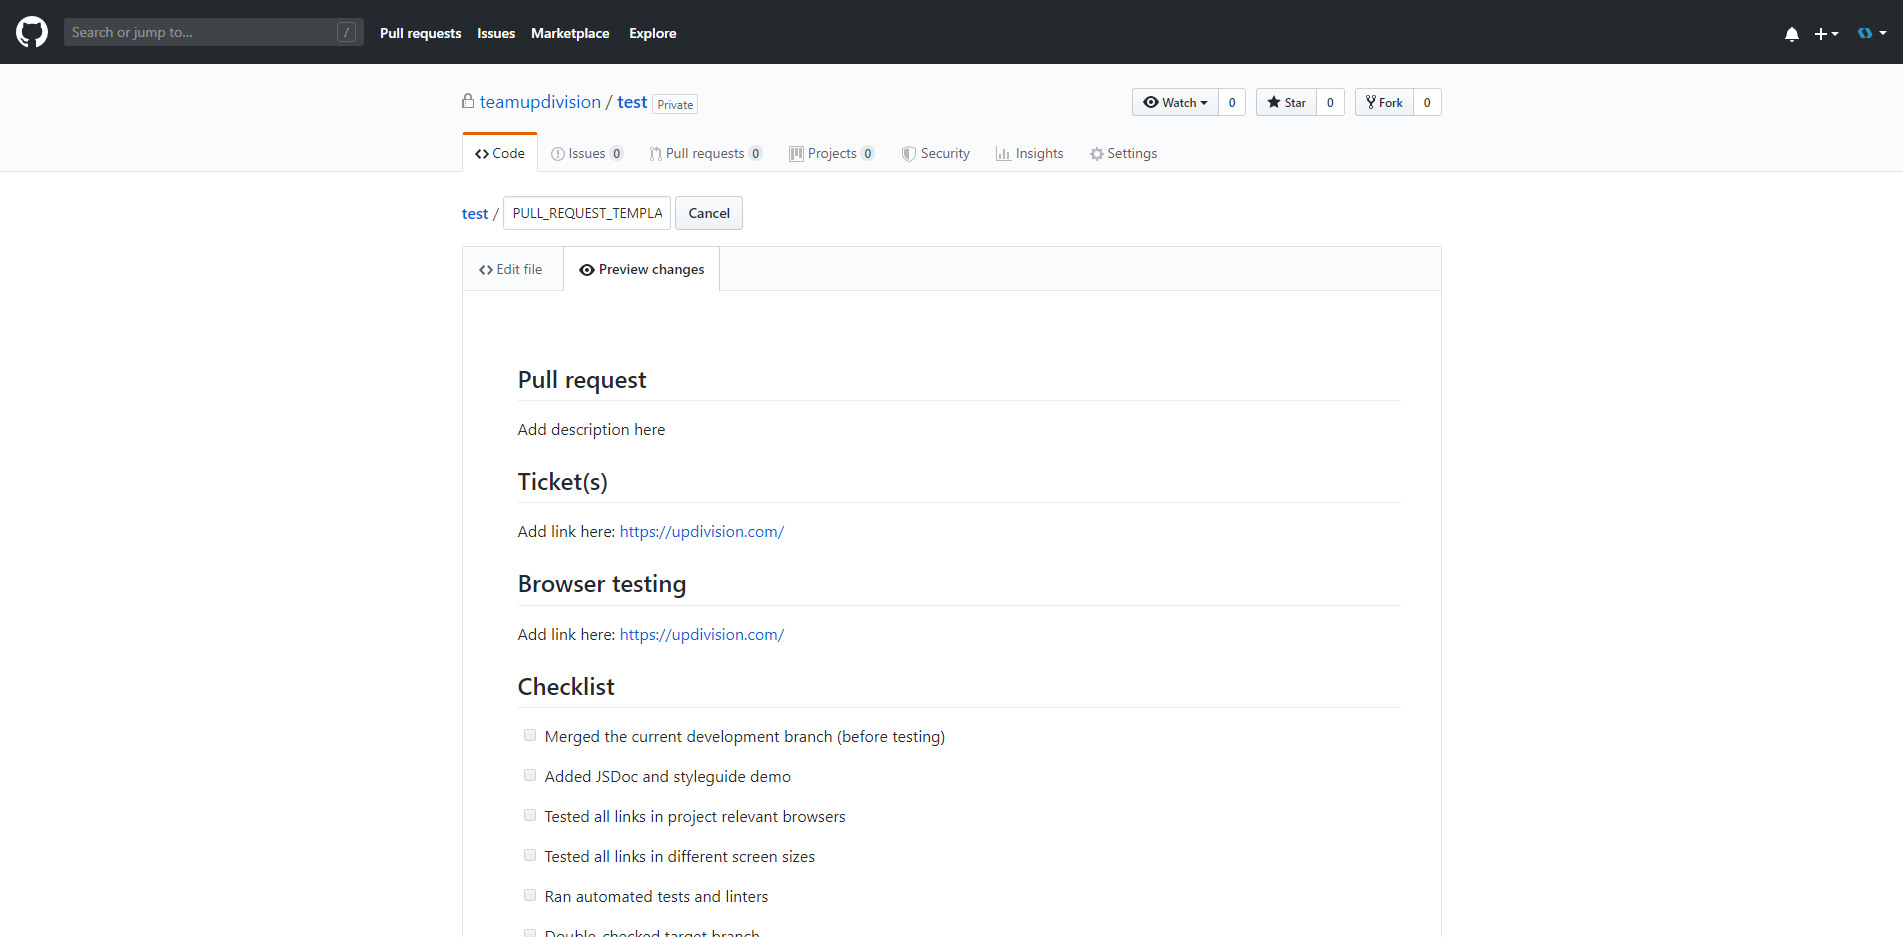
To create a Pull Request template, click the Create new file button on the main page of the repository and name your file PULL_REQUEST_TEMPLATE. Make sure to add the .md file extension if you`re going for markdown.
Markdown templates enable you to use features like markdown formatting, mentions or task lists with checkboxes.
Mentions: In the body of the new file you can use @person or @team to mention people or teams responsible for reviewing the proposed changes and to send them a notification.
Task lists with checkboxes: precede each task in the list with: - [ ]
This will create a list with clickable checkboxes. You can select or unselect the checkboxes to track progress. To mark a task as complete, use [x].
To make sure you formatted everything properly, use the Preview option.
You have several options for storing the template:
- In the repository`s root directory: repository/pull_request_template.md
- In the docs directory: repository/docs/pull_request_template.md
- In a hidden directory: repository/.github/pull_request_template.md
- In a PULL_REQUEST_TEMPLATE subdirectory (either in root, docs or .github)
A PULL_REQUEST_TEMPLATE subdirectory allows you to store multiple PR templates in the same place.
Storing the templates in a PULL_REQUEST_TEMPLATE subdirectory also allows you to use the template query parameter in order to specify which PR template you would like to use to fill the description field. For example, for your pull_request_template1.md file, you would need to add to new pull request`s URL: ?template=pull_request_template1.md.
Once the pull_request_template.md file is detected, GitHub will automatically populate the new pull requests with the template content.
Bitbucket Cloud
Bitbucket Cloud offers a more intuitive way of creating PR templates, although with less features. For the moment, templates can be added only as a repository setting, although Atlassian is considering support for markdown files. PR templates are available for Bitbucket Cloud only, so they don`t cover Bitbucket Server.
To add a PR template, simply go to your repository`s Settings and then click the “Default Description” tab under Pull Requests.
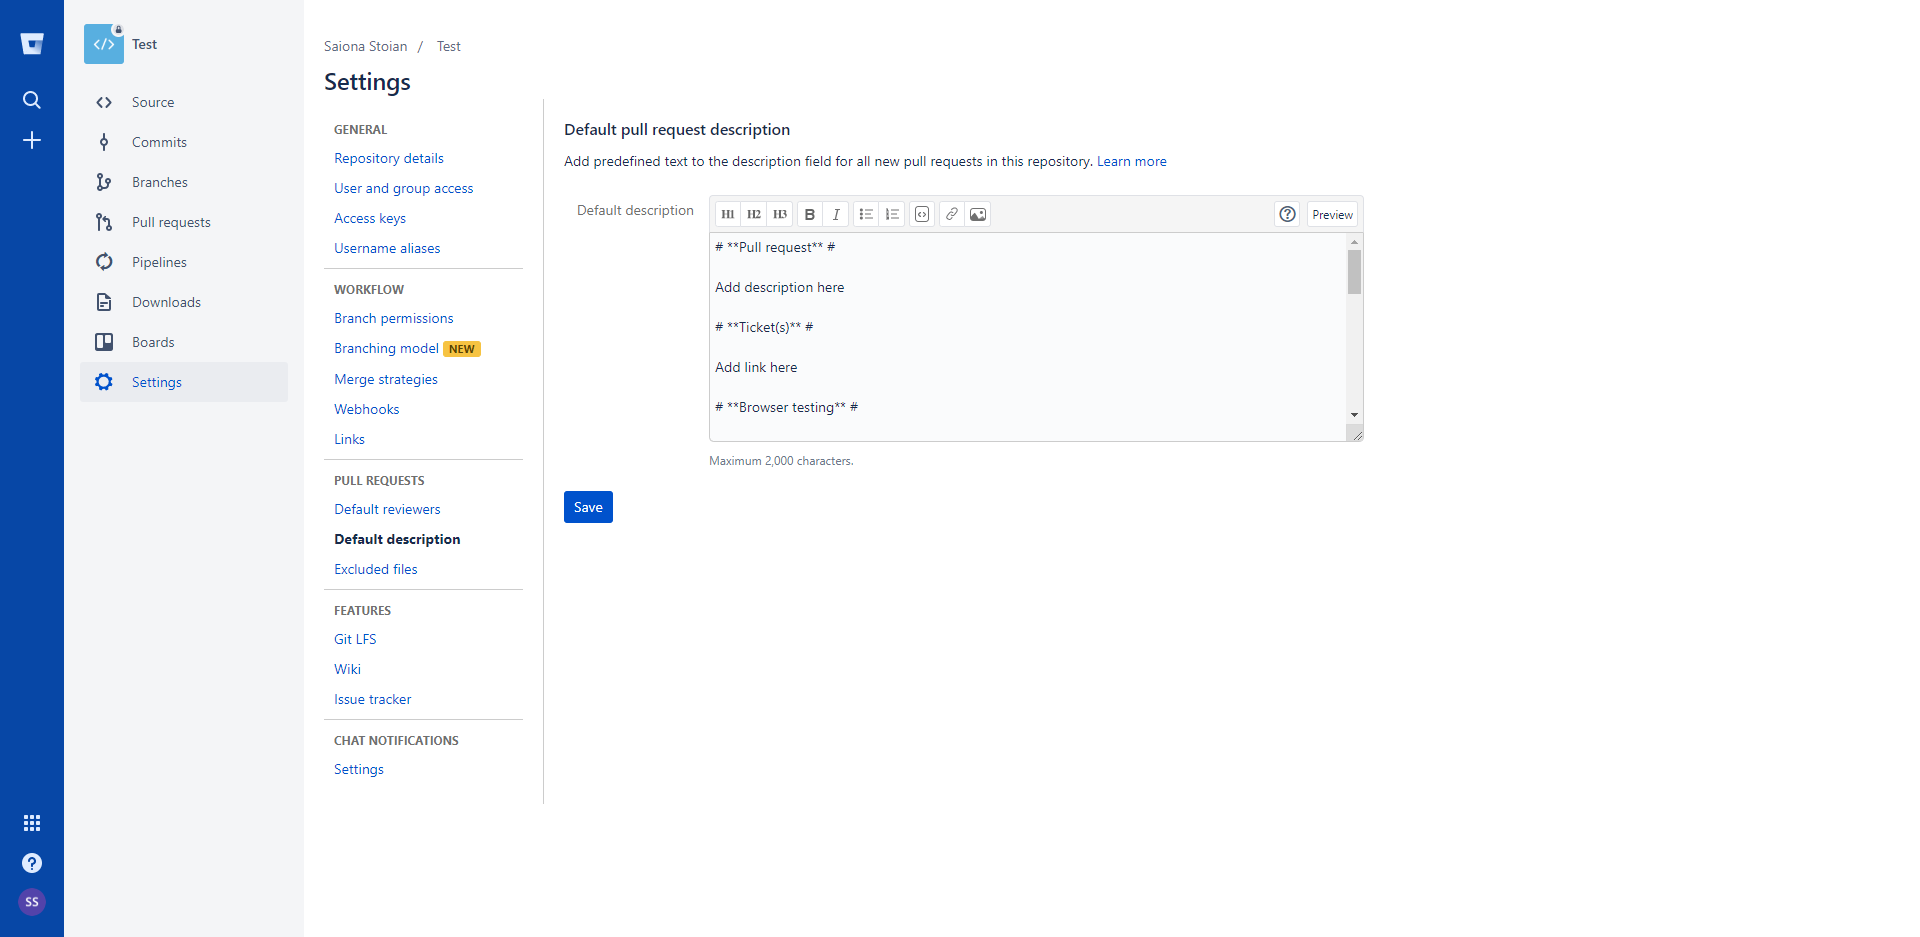
You will then be able to add a default description which will be automatically applied for all new pull requests in the repository.
PR templates for your projects. Take two.
Code review is one of the most time-consuming parts of the software development process. It`s no surprise that the most common complaint in sprint retrospectives revolves around the endless “in review” columns in agile boards.
A good PR template sets the context for the code review and allows you not only to optimize for speed, but to customize for speed.
Below are two PR templates we use for our frontend and Laravel projects, with a complete checklist of actions we go through each time. Feel free to add or remove items as needed for your own specific use case.
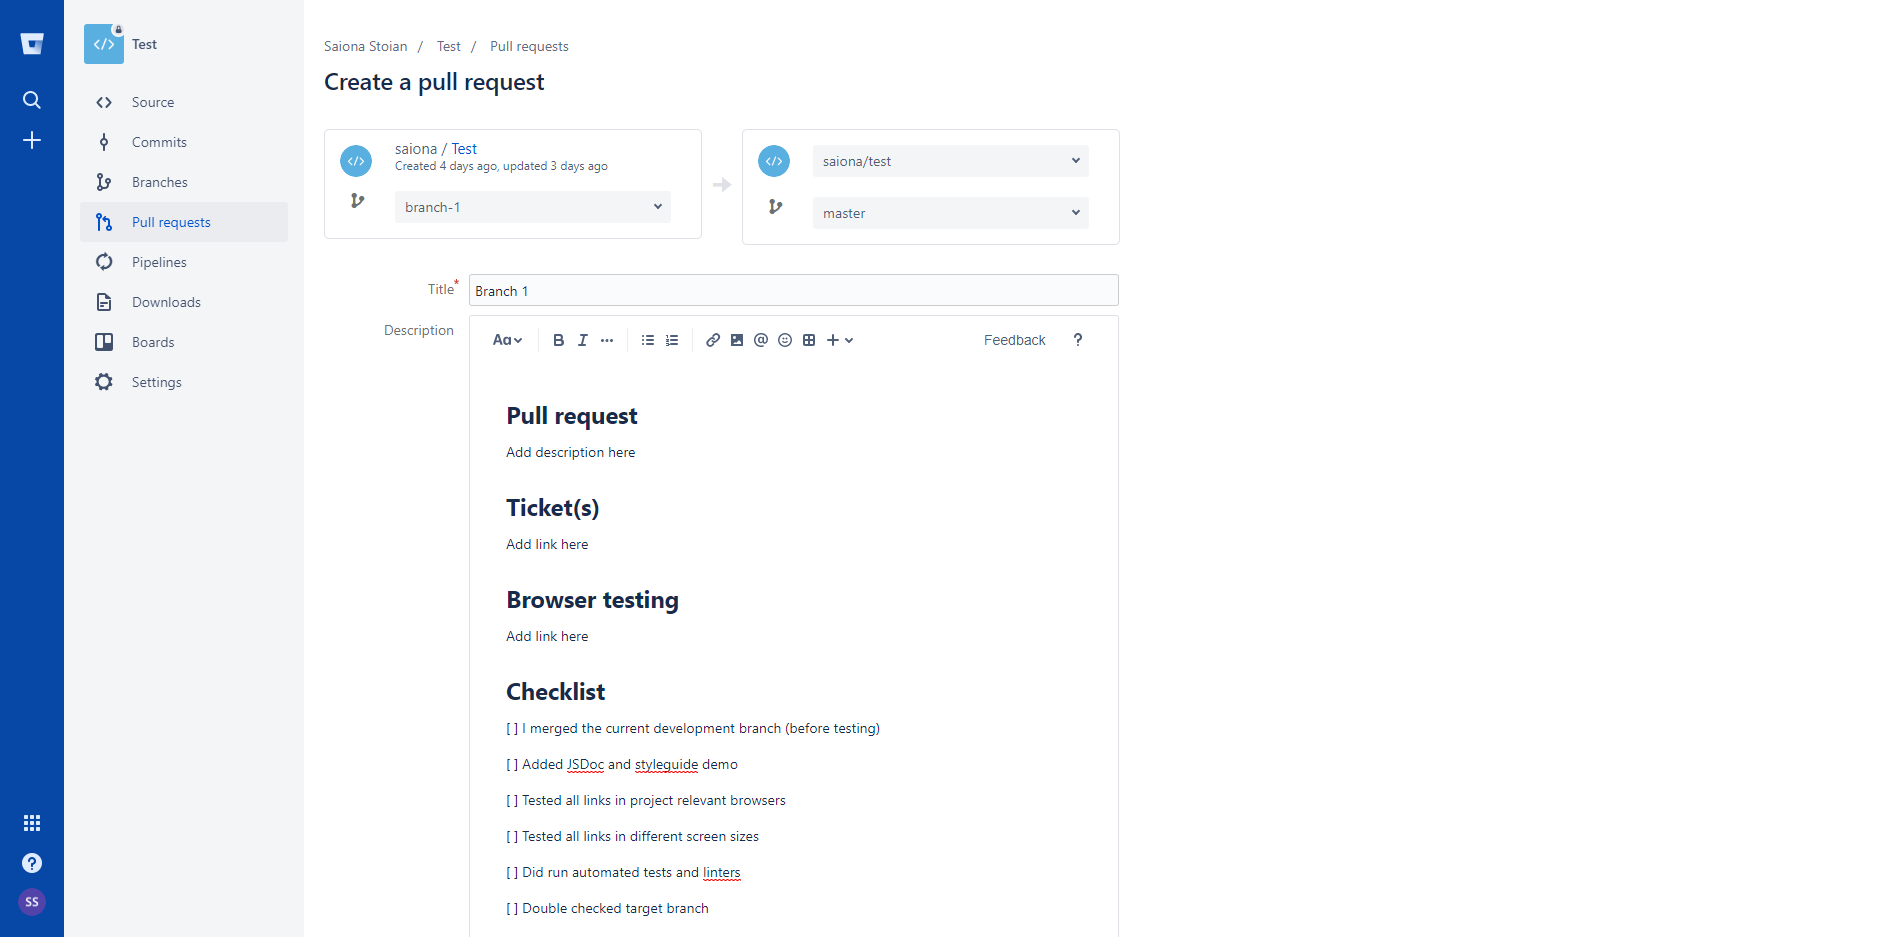
TEMPLATE ONE (Frontend)
Pull Request
The purpose of the pull request.
Ticket(s)
Links to any open tickets.
Browser Testing
Links to browser tests.
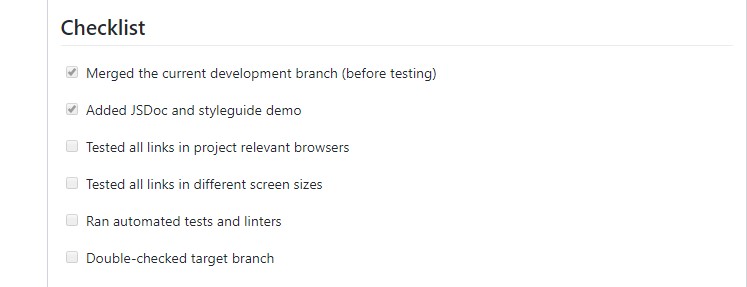
Checklist
[ ] merged the current development branch (before testing)
[ ] added JSDoc and styleguide demo
[ ] tested all links in project relevant browsers
[ ] tested all links on different screen sizes
[ ] ran automated tests and linters
[ ] double-checked target branch
Review/Test checklist
[ ] ran automated tests and linters
[ ] reviewed code and documentation
[ ] tested all links in project relevant browsers
[ ] tested all links on different screen sizes
[ ] checked accessibility (Wave, only errors)
TEMPLATE TWO (LARAVEL WITH FRONTEND OR API)
Pull Request
The purpose of the pull request.
Ticket(s)
Links to any open tickets.
Browser Testing
Links to browser tests.
Checklist
[ ] merged the current development branch (before testing)
[ ] ran automated tests
[ ] checked PSR2 coding standard and comments
[ ] double-checked target branch
// if API
[ ] added/updated API testing endpoints and documentation
// If frontend
[ ] tested all links in project relevant browsers
[ ] tested all links on different screen sizes
[ ] ran automated tests and linters for frontend
Review/Test checklist
[ ] ran automated tests and linters
[ ] reviewed code and documentation
// if API
[ ] reviewed API endpoints and documentation
// If frontend
[ ] tested all links in project relevant browsers
[ ] tested all links on different screen sizes
[ ] checked accessibility (Wave, only errors)
Good, better, best practices
Below are some of the things we`ve managed to improve with the help of PR templates:
- Keep track of what should be done for every change: this includes testing, adding tests units and updating documentation.
- Standardize the information we want contributors to include: anything considered mandatory/important now goes into the PR template, for example a checklist of actions to be completed/considered before submitting a PR.
- Make the code review and approval process run smoother: the reviewer knows what to expect when reviewing the code and the developer knows he or she didn`t miss anything of essence. The description can provide additional context to the commit history, such as screenshots, links, testing notes or the business context of the change.
- Form good git habits among less experienced developers: checklists are not only useful for ensuring PR conformity, they can also help beginner developers learn to write a good PR description.
And probably the most obvious benefit of all: No more copying and pasting!
Do you have any tips & tricks for making the code review process run smoother? Be sure to let us know in the comments and don`t forget to subscribe to our newsletter for other cool stuff we learned along the way.